NOTE: The below instructions have been tested with CodeIgniter 2.1.0 and TankAuth 1.0.9; and they work fine. There is one additional change that must be done in the config.php file (CI), it is related to the new parameter ‘encryption_key’.
Tank Auth is an authentication library based on DX Auth, developed for the PHP framework CodeIgniter. This brief tutorial shows the steps needed to install TankAuth.
The following applications and libraries were used:
- Ubuntu 10.04
- PHP 5.2
- MySQL 5.1
- Eclipse Galileo (3.5) with PHP Development Tools (PDT).
- CodeIgniter 1.7.3
- TankAuth 1.0.7
1. Creating a New Project
The first step is to create a new Eclipse PHP project by selecting FILE → NEW → PHP PROJECT. The project name I used was TankAuthLogin and the default options should be selected (to keep it nice and simple).
* The new project should be created in the /var/www/phpsites folder. This folder was configured to store all the web sites and it is accesible via http://localhost/phpsites.
2. Integrating CodeIngiter and TankAuth
Once the project is created, you must download CodeIgniter (CI) and TankAuth. The CI zip file contains two folders: SYSTEM, USER_GUIDE and one file: INDEX.PHP. The SYSTEM folder and the INDEX.PHP file must be copied into the TankAuthLogin project. To include the TankAuth library, follow these steps:
- Copy the APPLICATION content folder into CI APPLICATION folder.
- Copy the CAPTCHA folder to the CI folder.
- Create the TankAuth DB tables (described below).
- Open APPLICATION/CONFIG/CONFIG.PHP file and update the $config[‘sess_use_database’] variable to TRUE.
After this, you will get the following file structure:
3. Creating The TankAuth Tables
TankAuth includes a SCHEMA.SQL file which the queries to generate the required tables. You can run this file using any DB administration software; I ran this file using MySQL Query Browser and the tables were created under the TankAuth schema. Once the file is executed, you will get the next table structure:
4. Configuring TankAuth
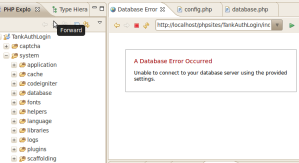
So far, we have all the necessary files for our application, but it is not functional yet. If you try to access the web site, the following error is thrown:
To have a working site, you must modify the next set of files:
- APPLICATION/CONFIG/CONFIG.PHP-> base_url variable must be updated as follows:
- $config[‘base_url’] = “http://localhost/phpsites/TankAuthLogin“;
- APPLICATION/CONFIG/AUTOLOAD.PHP -> captcha plugin must be added (OPTIONAL):
- $autoload[‘plugin’] = array(‘captcha’);
- APPLICATION/CONFIG/DATABASE.PHP -> Update the following variables:
- $db[‘default’][‘hostname’] = “localhost”; (database IP address)
- $db[‘default’][‘username’] = “dbuser”; (database username)
- $db[‘default’][‘password’] = “userpass”; (password)
- $db[‘default’][‘database’] = “TankAuth”; (database schema)
- $db[‘default’][‘dbdriver’] = “mysql”;
- $db[‘default’][‘dbprefix’] = “”;
- $db[‘default’][‘pconnect’] = TRUE;
- $db[‘default’][‘db_debug’] = TRUE;
- $db[‘default’][‘cache_on’] = FALSE;
- $db[‘default’][‘cachedir’] = “”;
- $db[‘default’][‘char_set’] = “utf8”;
- $db[‘default’][‘dbcollat’] = “utf8_general_ci”;
After making these changes, reload the website. You should see the following web page:
NOTE: Unlike DX Auth, Tank Auth does not create a default user. You must create a user on your own. But before doing that, you must configure the CAPTCHA plugin and set the email parameters. This last step is needed because Tank Auth will send an activation link (by email) when a new user is registered (This functionality is also used on the “forgot password” option).
5. Setting Up the CAPTCHA folder
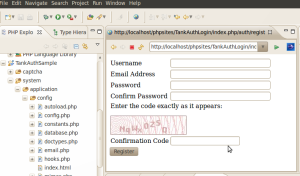
So far, if you try to register a new user you should get the following form:
As you can see, the web page does not show the CAPTCHA image, this is because the permissions that are currently set to this folder. In order to change permissions, you must provide write access to the www user. In Linux, you can run the following command:
sudo chmod -R 777 www_path/TankAuthLogin/captcha
NOTE: This command provides an easy way to set up the permissions on this folder, but you MUST NOT keep full write/read access when your code is under production.
If you refresh the web page, you should be able to see the CAPTCHA image:
6. Setting up the Email
The last step covers email setup. This functionality is used when a new user is created and when the user forgets the password. To set up the email, you must update the APPLICATION/CONFIG/EMAIL.PHP file as follows:
$config[‘protocol’]=‘smtp’;
$config[‘smtp_host’]=‘ssl://smtp.googlemail.com’; (SMTP server)
$config[‘smtp_port’]=‘465’; (SMTP port)
$config[‘smtp_timeout’]=’30’;
$config[‘smtp_user’]=‘googleuser’; (user@gmail.com)
$config[‘smtp_pass’]=‘userpass’; (gmail password)
$config[‘charset’]=‘utf-8’;
$config[‘newline’]=“\r\n”;
GMAIL is being used as the email provider in this example, but you can always use a different provider.
7. Registering a New User
Once the required fields are filled and the user is registered, the following message is received:
After this, the application will send the message to the registered email address. This message will contain the activation link which, when clicked, will make the user active and he/she will be able to log into the application:
Finally, the following authentication message is thrown when the user provides its credentials:
Hi, userlogin! You are logged in now. Logout


February 1st, 2011 at 3:19 am
[…] Configuración de Tank Auth By Oscar (English version) […]
September 14th, 2011 at 1:01 am
Thank you, this worked perfectly. You saved me a headache.
April 8th, 2013 at 10:42 am
everything is ok but shows me error while clicking on Logout link—–A PHP Error was encountered
Severity: Notice
Message: Undefined index: session_id
Filename: libraries/Session.php
Line Number: 272
A PHP Error was encountered
Severity: Notice
Message: Undefined index: ip_address
Filename: libraries/Session.php
Line Number: 272
A PHP Error was encountered
Severity: Notice
Message: Undefined index: user_agent
Filename: libraries/Session.php
Line Number: 272
A PHP Error was encountered
Severity: Notice
Message: Undefined index: last_activity
Filename: libraries/Session.php
Line Number: 272
A PHP Error was encountered
Severity: Notice
Message: Undefined index: session_id
Filename: libraries/Session.php
Line Number: 288
A PHP Error was encountered
Severity: Notice
Message: Undefined index: last_activity
Filename: libraries/Session.php
Line Number: 289
A PHP Error was encountered
Severity: Warning
Message: Cannot modify header information – headers already sent by (output started at C:\xampp\htdocs\CodeIgniter\system\core\Exceptions.php:185)
Filename: libraries/Session.php
Line Number: 675
A PHP Error was encountered
Severity: Warning
Message: Cannot modify header information – headers already sent by (output started at C:\xampp\htdocs\CodeIgniter\system\core\Exceptions.php:185)
Filename: helpers/url_helper.php
Line Number: 542
April 8th, 2013 at 3:54 pm
Did you use the CI 1.7.3 and TankAuth 1.0.7? I you didn’t, you might want to check the sess_destroy method from Session.php (CI/system/libraries). It should look like this:
function sess_destroy()
{
// Kill the session DB row
if ($this->sess_use_database === TRUE AND isset($this->userdata[‘session_id’]))
{
$this->CI->db->where(‘session_id’, $this->userdata[‘session_id’]);
$this->CI->db->delete($this->sess_table_name);
}
// Kill the cookie
setcookie(
$this->sess_cookie_name,
addslashes(serialize(array())),
($this->now – 31500000),
$this->cookie_path,
$this->cookie_domain,
0
);
}
It seems there is a bug in one of the CI versions. You might want to check this thread.
April 11th, 2013 at 1:16 pm
Is there any weay to set Thank login to be on the first page i get this loop error when i set Tank as root in config file?
May 15th, 2013 at 7:43 am
Howdy, I discovered your blog on http://expertnotfound.
wordpress.com/2011/01/20/setting-up-tank-auth-2/ at the same time as browsing for a related topic, your blog came up, it seems great.
I’ve saved it in my google bookmarks.
May 15th, 2013 at 2:28 pm
Hey! thank you. I am glad you liked it.
May 17th, 2013 at 4:52 am
thank you for your blog .but my tank auth is not sending an activation email to the registered user.
May 20th, 2013 at 1:08 am
Have you checked the logs? (/var/log/apache2). You might have a problem with your credentials. You should try to debug the _send_email method found in auth.php. Unfortunately, the register method does not check if the email was sent successfully before displaying the ‘success’ message.
September 16th, 2013 at 12:57 am
HI
I new with CI so can you send me full code of this lesson. Thank you
my email: tuannh.seda@gmail.com
October 16th, 2013 at 12:43 pm
applied. Thanks
October 10th, 2014 at 3:24 am
Error Number: 1054
Unknown column ‘new_email’ in ‘where clause’
SELECT 1 FROM (`users`) WHERE LOWER(email)= ‘enockm15@gmail.com’ OR LOWER(new_email)= ‘enockm15@gmail.com’
Filename: C:\wamp\www\TankAuth_login\system\database\DB_driver.php
Line Number: 330